Linux Dedicated and VPS servers are managed using a terminal and SSH. You’ll need to have an SSH client and, optionally, an SSH key pair. Clients generally authenticate either using passwords (which are less secure and not recommended) or SSH keys (which are very secure and strongly recommended).
To log in to your Server with SSH, you need three pieces of information:
The Server’s IP address
The default username on the server
The default password for that username, if you aren’t using SSH keys
How to Connect to your Server using PuTTY on Windows
PuTTY is an open-source SSH and Telnet client for Windows. It allows you to securely connect to remote servers from a local Windows computer.
If you don’t have PuTTY installed, visit the PuTTY website and choose the Windows installer from the Package files list. Once PuTTY is installed, start the program.
Configuring PuTTY
On the PuTTY Configuration screen that opens, fill in the field labeled Host Name (or IP Address) with your Server’s IP address, which you can find in the control panel. Confirm that the Port is set to 22 and that the Connection type SSH is selected.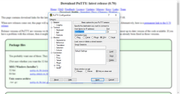
Next, click on SSH in the left sidebar (under Connection). Make sure “2” is selected for SSH protocol version.
If you want to create an SSH key pair, you can add them in the Auth subcategory. In the Private key file for authentication section, click the Browse button.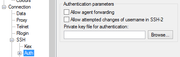
Search for the private key file that you saved. This is the key that ends in .ppk. Find it and select “Open” in the file window.
Next, in the Connection subheading in the Data configuration section, enter your server’s username in the Auto-login username field. For the initial setup, this should be the root user, which is the administrative user of your server. If you’re using CoreOS, Rancher, or FreeBSD, the username will be core, rancher, or freebsd instead of root, respectively.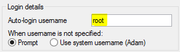
Finally, you can save these preferences to avoid typing them manually in the future. Click on Session in the left sidebar, then add a name in the text box under Saved Sessions and click Save on the right.
You now have saved all of the configuration data needed to connect to your new server.
Connecting with PuTTY
Once you have a session saved, you can recall these values at any time by returning to the Session screen, selecting the session you would like to use in the Saved Sessions section, and clicking Load to recall the settings. This will auto-fill all of the fields with the values you initially selected.
Before you connect to a server for the first time, PuTTY will ask you to confirm that you trust the server. Choose Yes to save the server identity in PuTTY’s cache or No to connect without saving the identity.
After PuTTY starts, type in the root password that was emailed to you. If you uploaded SSH keys, you will either be connected directly or prompted for the password you set on your key.
When you have successfully authenticated, you will be connected to your new Server.
