Introduction
VPN, or virtual private network, is a secure method of connecting remote internet resources together as if they were under the same LAN. OpenVPN is a popular implementation that works on Linux, Windows, and Mac operating systems and can be utilized to create complex, encrypted networks between physically dispersed servers.
The OpenVPN Access Server is a solution built on top of traditional OpenVPN that is used as a complete portal for managing connections, users, and interfaces. It provides the underlying VPN instance, a web interface for managing the suite, and a client that can be used within a web browser.
In this guide, we'll install and configure the OpenVPN Access Server on a CentOS 6.5 VPS instance.
Download and Install Packages
Download and Install Packages
We can obtain the OpenVPN Access Server package for CentOS from the project's website .
Right click on the package that matches your version of CentOS and your machine's architecture. Select the "copy link address" item or whatever option is closest.
On your CentOS VPS , download the package with curl -O (that's the letter "o" not a zero) followed by the URL you copied from the page. In my case, this turned out to be:
When the package has been downloaded, you can install it with using the rpm command:
After installing the package, an administration account is created called openvpn. However, no password has been set.
Set a password for the administrator's account by typing:
Now, the command line configuration steps are complete. The rest of the guide will focus on configuring options through the web interface.
Accessing the Web Interface
We can access our VPN portal by going to our server's IP address or domain name, at port 943. The server operates using TLS, so we will need to specify the https protocol.
For our initial interaction, we actually want to go to the administrative interface, which is the same, except ending with /admin:
https://server_ip_or_domain:943/admin
You will get a warning that the site's SSL certificates are not trusted:

This is expected and perfectly fine. All that this is telling us is that OpenVPN is using a self-signed SSL certificate, which is not trusted by default by our browser. We can click on the "Proceed anyway" button or whatever similar option you have.
Note: If you are unable to connect to the web interface, there's a chance that OpenVPN is bound to the wrong network interface. You can verify this by typing:
If the response does not show your server's public IP address, you will need to manually reconfigure it by typing:
Delete the current configuration by typing DELETE at the prompt. Next, accept the license agreement and press ENTER to mark this as the primary server. In the next prompt, select (1) all interfaces: 0.0.0.0 to bind to all interfaces. This will ensure that the access server is available in spite of a bind error in the OpenVPN installer. Press ENTER to accept the default values of the remaining prompts.
After reconfiguring, you should be able to access the web interface after accepting the SSL certificate in your browser.
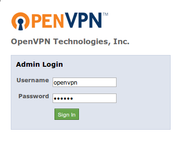
You will be presented with the admin login page. Use the username openvpn and the password you set for this user:
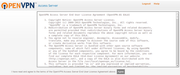
You will be taken to the OpenVPN Access Server's EULA, which you will have to agree to if you wish to continue:
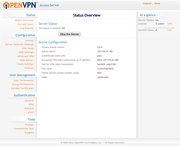
Once you log in, you can see the administrative interface, complete with some useful at-a-glance stats on the landing page:
Here, you can configure your VPN server. The access server separates the web interface and the actual VPN access and each can be configured independently.
For instance, if you go to the Server Network Settings in the left-hand menu, you will see a page where you can configure the port and interface that each component operates on. You can also specify the address pool that will be available to the clients.
Another thing you might want to do is add users and configure the authentication methods. You can add VPN users that match your system users, or add users that you might be controlling through an LDAP server.
Logging in as a Client
When you are finished configuring things as an admin, you can visit the client portion by going to your IP address or domain name followed by port 943:
https://server_ip_or_domain:943
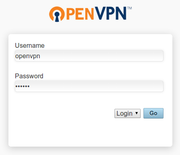
You will have to type in a username of a user that you have configured VPN access for:
If you the user that you logged in as has been designated as an OpenVPN admin account, you will see an "Admin" button that can be used to take you back to the admin control panel. Either way, you will be taken to a page that will allow you to download software for your client to connect to the VPN server:
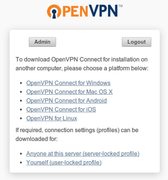
If your desktop is Windows or OS X, or if you have an android or iOS device, you can download an OpenVPN Connect client that will operate within your browser. If your desktop is a Linux machine, you will be asked to download the normal VPN client.
You should follow the directions of the client of your choice. If you are using the Linux client, you'll need to download the connection settings profile by clicking on the "Yourself" link:

Using the regular Linux openvpn client, you can connect using something like this:
sudo openvpn --config client.ovpn
Conclusion
Now, you should have a portal that can be used to configure your VPN access. This is an easy to manage interface that can be set up once and configured on-the-fly. It automatically generates valid configuration files for your users to connect to the server, which can save a lot of headaches with explaining how to configure access.
VPN, or virtual private network, is a secure method of connecting remote internet resources together as if they were under the same LAN. OpenVPN is a popular implementation that works on Linux, Windows, and Mac operating systems and can be utilized to create complex, encrypted networks between physically dispersed servers.
The OpenVPN Access Server is a solution built on top of traditional OpenVPN that is used as a complete portal for managing connections, users, and interfaces. It provides the underlying VPN instance, a web interface for managing the suite, and a client that can be used within a web browser.
In this guide, we'll install and configure the OpenVPN Access Server on a CentOS 6.5 VPS instance.
Download and Install Packages
Download and Install Packages
We can obtain the OpenVPN Access Server package for CentOS from the project's website .
Right click on the package that matches your version of CentOS and your machine's architecture. Select the "copy link address" item or whatever option is closest.
On your CentOS VPS , download the package with curl -O (that's the letter "o" not a zero) followed by the URL you copied from the page. In my case, this turned out to be:
cd ~
curl -O swupdate.openvpn.org/as/openvpn-as-2.7.4-CentOS6.x86_64.rpm
sudo rpm -i openvpn-as-2.7.4-CentOS6.x86_64.rpmSet a password for the administrator's account by typing:
sudo passwd openvpnAccessing the Web Interface
We can access our VPN portal by going to our server's IP address or domain name, at port 943. The server operates using TLS, so we will need to specify the https protocol.
For our initial interaction, we actually want to go to the administrative interface, which is the same, except ending with /admin:
https://server_ip_or_domain:943/admin
You will get a warning that the site's SSL certificates are not trusted:
This is expected and perfectly fine. All that this is telling us is that OpenVPN is using a self-signed SSL certificate, which is not trusted by default by our browser. We can click on the "Proceed anyway" button or whatever similar option you have.
Note: If you are unable to connect to the web interface, there's a chance that OpenVPN is bound to the wrong network interface. You can verify this by typing:
sudo netstat -plunt | grep openvpn
sudo /usr/local/openvpn_as/bin/ovpn-initAfter reconfiguring, you should be able to access the web interface after accepting the SSL certificate in your browser.
You will be presented with the admin login page. Use the username openvpn and the password you set for this user:
You will be taken to the OpenVPN Access Server's EULA, which you will have to agree to if you wish to continue:
Once you log in, you can see the administrative interface, complete with some useful at-a-glance stats on the landing page:
Here, you can configure your VPN server. The access server separates the web interface and the actual VPN access and each can be configured independently.
For instance, if you go to the Server Network Settings in the left-hand menu, you will see a page where you can configure the port and interface that each component operates on. You can also specify the address pool that will be available to the clients.
Another thing you might want to do is add users and configure the authentication methods. You can add VPN users that match your system users, or add users that you might be controlling through an LDAP server.
Logging in as a Client
When you are finished configuring things as an admin, you can visit the client portion by going to your IP address or domain name followed by port 943:
https://server_ip_or_domain:943
You will have to type in a username of a user that you have configured VPN access for:
If you the user that you logged in as has been designated as an OpenVPN admin account, you will see an "Admin" button that can be used to take you back to the admin control panel. Either way, you will be taken to a page that will allow you to download software for your client to connect to the VPN server:
If your desktop is Windows or OS X, or if you have an android or iOS device, you can download an OpenVPN Connect client that will operate within your browser. If your desktop is a Linux machine, you will be asked to download the normal VPN client.
You should follow the directions of the client of your choice. If you are using the Linux client, you'll need to download the connection settings profile by clicking on the "Yourself" link:
Using the regular Linux openvpn client, you can connect using something like this:
sudo openvpn --config client.ovpn
Conclusion
Now, you should have a portal that can be used to configure your VPN access. This is an easy to manage interface that can be set up once and configured on-the-fly. It automatically generates valid configuration files for your users to connect to the server, which can save a lot of headaches with explaining how to configure access.
